Display Fake Cpu Configuration on System Properties…
Have you ever wondered to surprise your friend by showing a high end
processor on your system. Though you lie about having such processor,
they could easily find out by simply checking your system properties. In
Windows, we usually use system properties to view system details like
Processor and RAM details. To open the system proprieties (Press Window Logo + Pause Break Or Right click on My computer and Select Properties).
So, When you buy new System, your friends usually check your system
specification just by going to System Properties. Try this trick to fool
your friends or to play pranks on your friends.
This trick is for windows where you can modify CPU information and the same displays in System Properties. Suppose you want to display processor like core i7 or Core 2 Quad or Pentium 2 or anything. Basically, you can edit and write whatever you want.
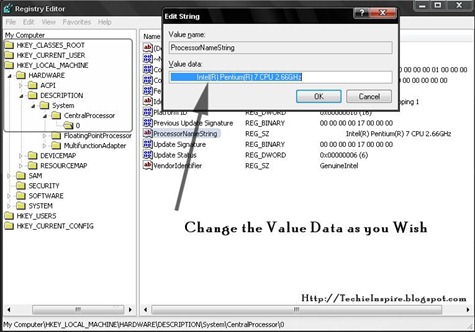
In the above image, I have changed my processor detail to Pentium 7, However, There is no Pentium 7 yet.
Follow below steps to Display fake PC configurations
Note: Any change to system properties is a temporary, i.e., The changes you made will not take effect after restart. After Restarting the Pc, the system properties will be back to the same. It will display the real configuration details.Step 1: Go to Start –> Run –> Type "Regedit" and Press Enter.
Step 4: Now, Double-Click on "ProcessorNameString"
and modify its value data. Change the Value Data as you wish. After
Changing the value Date, Press Ok. Suppose you Change to Intel(R)
Pentium(R) 8 CPU 7.66GHz, This detail will be shown on system
properties.
Now, Check the System Properties(Press Window Logo + Pause Break).


0 comments:
Post a Comment
Did You Enjoy this Article ?